

How To Remove Scratches From Clear Coat Paint
All cars have scratches regardless of how well they are taken care of. Scratches can occur during washing, by someone rubbing up against your car, opening the door with your keys in your hand, and much more. No matter how they occur, clear coat scratches can be fixed relatively easily at home.
There are two ways of fixing clear coat car scratches depending on the severity of the scratch. One method is extremely easy and can take a few minutes using a scratch remover and a microfiber towel. The other method is a bit more involved and will take longer using the 3M Scratch Removal System and a microfiber towel.
Regardless, it will save you money by fixing car scratches by yourself than taking it to an auto body shop.
Identify the Scratch
Not all scratches on your car are equal, as there are several layers to your car's paint.
You should understand these layers before continuing, as this will help you identify the type of scratch you have and how to fix it.
Most importantly, you should understand the clear coat layer of your car. It is highly recommended to read the article: Car Clear Coat: What Is It?
Types of Car Scratches
There are two different types of clear coat scratches that this guide will teach you how to fix.
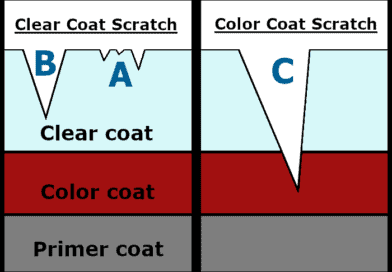
The first type of clear coat scratch, which is identified on the graphic as "A" is very easy and quick to fix. This is a light scratch in the clear coat.
The second type of clear coat scratch, identified as "B" is a bit more difficult to fix, but can still be done by yourself pretty easily. This is a deep scratch in the clear coat.
This guide will not teach you how to fix a color coat scratch (labeled as "C"), as this will require touch-up paint and additional materials.
You can read more about the different types of car scratches here.
How to Identify the Scratch
Run your fingers over the scratch while the surface of the car is clean.
- If you cannot feel the scratch, it is a light scratch that will likely be fixed using the first method.
- If you can feel the scratch AND your fingernail does not catch easily on the scratch, it is a deep clear coat scratch that must be fixed using the second method.
If your fingernail does catch on the scratch, it may need fixed with a more advanced method using touch-up paint.
Fixing a Light Scratch (First Method)

Now that you have identified it as a light scratch, you will remove it with a scratch remover and a microfiber towel.
I recommend using Mother's California Gold Scratch Remover . I use this product often and it has helped me remove or reduce many scratches. Read my full review of the product here.
Repairing light clear coat scratches with Mother's scratch remover is extremely easy and only takes a minute or two.
Follow the steps below to remove the light scratch from your car:
- Make sure the surface that you are working on is clean and dry.
- Apply a small amount of the scratch remover to the microfiber towel and polish the scratch.
- Apply moderate pressure while attacking the scratch at multiple angles, using both circular and side-to-side motions.
- Wipe the excess with a clean, dry microfiber towel.
- Inspect the scratch to see if it has improved. Repeat once more if necessary.
[Related Article: 10 Best Electric Buffer For Car Waxing And Buying Guide]
Fixing a Deep Scratch (Second Method)

To fix a deep clear coat scratch, you will need the 3M Scratch Removal System and a microfiber towel.
The product has fantastic reviews on Amazon and is used by many people to fix deep scratches easily.
This is a brief overview of the steps involved in removing deep clear coat scratches from your car.
Be sure to follow the detailed instructions provided with the kit.
- Clean and dry the scratch and the area surrounding it.
- Sand the scratch with the sandpaper included with the kit, lubricating with water, until the scratch has been removed.
- Apply rubbing compound using a drill and the compounding pad provided with the kit until haziness is removed. Small sanding scratches may still be visible at this point.
- Apply polish using a drill and the polishing pad provided with the kit until the desired shine is achieved.
- Follow by applying a layer of paste wax for extra protection.
Preventing Scratches
A commonplace for scratches to occur are on and around the door handles.
This is because your nails may scratch the paint or you're holding keys or other items while opening the door.
Scratches can occur during washing, whether you wash your car by hand or at a car wash.
Touch car washes should always be avoided! They pick up dirt from all the cars that pass through, then scratch up your paint with it.
You must also be cautious when washing your car by hand. Washing a car with a microfiber sponge that has heavy amounts of dirt can scratch the paint easily.
You should look out for areas that are commonly scratched on your vehicle and be aware of them.
Not all scratches can be prevented, as it is a part of owning a vehicle, but we can be more cautious to prevent some of them.
Check out the list of recommended products that kept my car squeaky clean and shiny.
How To Remove Scratches From Clear Coat Paint
Source: https://carcleaningguide.com/remove-scratches-car/
Posted by: petersonafess1946.blogspot.com
0 Response to "How To Remove Scratches From Clear Coat Paint"
Post a Comment