

How To Clean Up Ram On Windows Xp
Z7_3054ICK0KGTE30AQO5O3KA30N0
hp-concentra-wrapper-portlet
![]() Actions
Actions
HP and Compaq Desktop PCs - Resolving Low on Disk Space or Out of Disk Space Errors (Windows Vista, XP, ME, and 9x)
This document applies to HP and Compaq Desktop Computers with Windows Vista, XP, Me, 98, and 95.
Windows uses disk space for caching files and virtual memory. The computer might not be reliable if the free space on the hard drive drops below 100 MB, or 200 MB for Windows Vista and XP. Some software programs or tasks might require more than 100 MB, such as printing a large graphic file.
Complete the following instructions to free up space on the hard disk.
Check disk space
-
Open My Computer (Computer, in Windows Vista) using one of the following methods:
-
Windows Vista. Click Start and then click Computer.
-
Windows XP. Click Start and then click My Computer.
-
Windows 95, 98, and Me. Double-click the My Computer icon on the desktop.
-
-
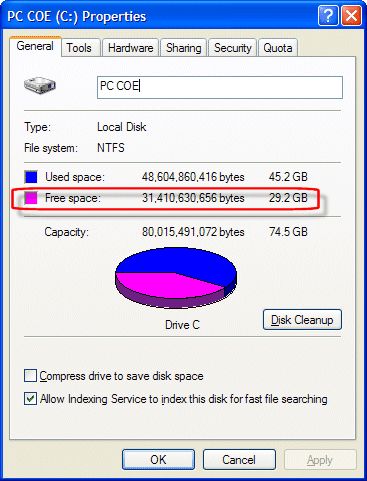
Right-click the main hard drive (usually (C:)), and click Properties.
-
Click the General tab, and find the amount of free space that is available on the hard disk drive.
Figure : Free space on the hard drive
-
If there is less than 5% of total hard drive space available, free up hard drive space. To make more space on the hard drive, follow the instructions in the following documents based on your Windows version:
If you have more than 5% of total hard drive space available, the work being performed is requiring too much resources for the amount of space available on the hard drive. The following list shows examples of work that can cause these messages:
-
Copying files from a CD to the hard drive, when there is not enough free space.
-
Working with large graphic files, such are those created when using a scanner.
-
Recording TV or Video programs on the computer.
To resolve the errors, free up as much space as possible, and then try to reduce file sizes when you are working.
-
Empty the Recycle Bin
Follow these steps to empty the recycle bin:
-
From the Windows desktop, double-click Recycle Bin.
-
Restore any mistakenly deleted items by right-clicking each file, then selecting Restore.
-
In Windows XP, Me, 98, and Windows 95, Click File and Empty the Recycle Bin.
In Windows Vista, click Empty the Recycle Bin.
-
Select Yes to confirm.
Windows removes the contents of the Recycle Bin from the hard disk (C: is most common).
-
Close the Recycle Bin.
Delete temporary files and directories
This step increases hard disk space and reduces the time Windows takes to access the hard drive. Windows uses a TEMP directory to temporarily store files intended only for temporary use. Over time, these files can build up and cause problems. To delete these files, use the following set of steps depending on the Windows version:
Windows Vista
-
Close all open software programs.
-
Click Start
 , All Programs, Accessories, System Tools, and then Disk Cleanup. The Disk Cleanup Options window opens.
Figure : Disk Cleanup Options

-
Click My files only or Files from all users on this computer.
-
Select the drive you want to clean up, and then click OK.
A message appears telling you that Disk Cleanup is calculating how much space you will be able to free on the drive you chose.
Figure : Disk Cleanup progress indication window

-
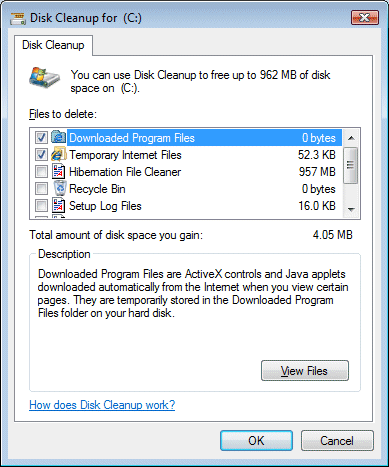
Place a check next to the types of files you want the Disk Cleanup utility to delete. Temporary files are safe to delete.
Figure : Disk Cleanup
-
Click OK.
-
Click Delete Files.
Windows XP, Me, and Windows 98
-
Close all open software.
-
Click Start, Programs, Accessories, System Tools, and then click Disk Cleanup.
-
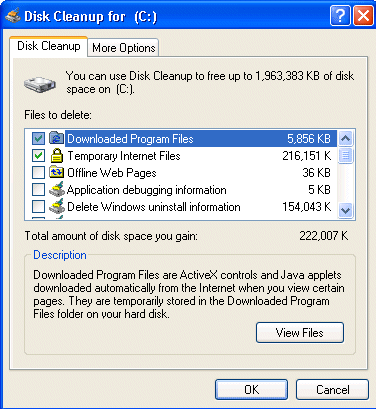
Place a check next to the types of files you want the Disk Cleanup tool to delete. Temporary files are safe to delete.
-
Select OK.
Figure : Disk cleanup
Windows 95
These steps delete temporary files (*.tmp) and subdirectories under C:\WINDOWS\TEMP.
-
Click Start, Shut Down, and restart the computer in MS-DOS®) mode.
-
When the DOS prompt displays, it reads C:\WINDOWS.
-
Type DELTREE TEMP and press the Enter key. Select Y, and press the Enter key to confirm. This deletes the TEMP directory, including all temporary files and subdirectories under C:\WINDOWS\TEMP.
-
After the TEMP directory has been removed, create a new TEMP directory. At the C:\WINDOWS prompt, type the following: MD TEMP.
-
Type EXIT to restart Windows.
-
When Windows has completed loading, click Start, click Find, and then click Files or Folders.
-
In the Named box, type *.TMP and click Find Now. A list of matching files displays.
-
Click Select All from the Edit menu.
-
Press Delete and select Yes to confirm. Some items might not be deleted because they are in use.
-
Exit the Find window and restart the computer.
Defragment the hard drive
The Disk Defragmenter utility takes all of the scattered bits of program data and groups them together in more efficient areas of the drive. A defragmented hard drive has more free space. Use these steps to defragment the hard drive:
-
Close all programs that are running. This includes background programs such as scanners.
-
Click Start, Programs or All Programs, Accessories, and then click System Tools.
-
Click Disk Defragmenter and follow the on-screen instructions.
If Disk Defragmenter starts repeatedly, a hidden background program is still accessing the hard drive. Restart the computer in Safe mode and try again.
Remove unwanted programs
Use the following steps to remove unwanted programs and increase hard drive space:
Windows Vista
-
Click Start
, and then click Control Panel. -
Under Programs, click Uninstall a program or double-click the Programs and Features icon.
-
Highlight a program name that is not used, and then click the Uninstall/Change button.
If you are prompted for an Administrator password or confirmation, type the password or provide confirmation. Click Yes to uninstall the program.
Figure : Removing programs

-
When done, a prompt may appear to restart Windows. Wait until completely removing the unwanted programs; then restart Windows.
Windows XP, Me, 98, and Windows 95
-
Click Start, Settings, and Control Panel.
-
Open Add or Remove Programs.
-
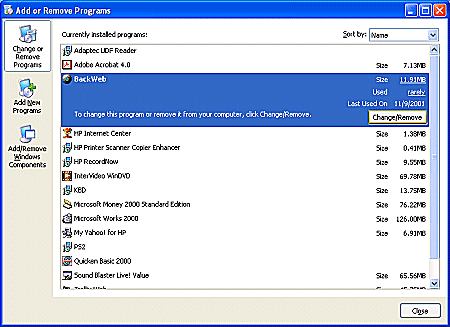
Click the Install or Uninstall tab. Select programs that are no longer being used.
-
Highlight the program name, and then click the Add/Remove or Change/Remove button and click OK.
Figure : Removing programs
-
When done, a prompt might display to restart Windows. Wait until completely removing the unwanted programs; then restart Windows.
Delete recorded TV programs
Recorded TV programs take up a lot of disk space. Deleting recorded programs you no longer need frees up space on the hard drive. Follow these steps to delete recorded programs in Windows Media Center and free disk space:
Windows Vista
-
Click Start, All Programs, and then click Windows Media Center.
-
Scroll to TV + Movies, then click recorded TV.
-
Click the name of the show to delete, then click Delete.
-
Click Yes to delete the show.
Windows XP Media Center 2005
-
Click Start, All Programs, and then click Windows Media Center.
-
Scroll to My TV, then click Recorded TV.
-
Click the name of the show to delete, then click Delete.
Adjust System Restore settings
System Restore is a feature of Windows that can revert system software and settings back to a particular date. System Restore does this by saving the changes made to system files in a restore point. These restore points use a lot of hard space. System Restore can fill twelve percent of the hard drive with restore points if left unadjusted, regardless of the entire size of the hard drive. Turning off System Restore deletes all restore points for that disk. You cannot restore the disk until you turn on System Protection again and a restore point is created.
Windows Vista
Turning off System Restore
To save hard drive space, use the following steps to turn off System Restore for a hard disk drive.
-
Click Start
, Control Panel, System and Maintenance, System, and then click System protection in the left pane. The System Properties window opens. -
To turn on System protection for a hard disk drive, place a check in the check box next to the drive.
Or
To turn off System protection, remove the check next to the drive.
- Click OK.
Using System Restore to fix problems
-
Click Start
, Control Panel, System and Maintenance, System, and then click System protection in the left pane. The System Properties window opens. -
Click the System Restore button.
- Select Recommended restore to undo the most recent update, driver, or software installation if you think it is causing problems.
-
Click Next and follow any onscreen instructions.
Windows XP
Use the steps in the following sections to reduce the space System Restore uses for restore points, delete all restore points, or turn off System Restore.
-
Click Start, and right-click My Computer.
-
Select Properties.
-
Click the System Restore tab.
-
Select the (C:) drive and click the Settings button.
-
Adjust the Disk space to use slider to a lower setting. A lower setting saves disk space, but reduces how many restore points you can select from when restoring in the future. On a 120 GB hard drive, a setting of 1% saves over 11 GB of future disk space and still provides enough room for several restore points.
-
Click OK to save the settings.
Figure : Disk space usage

Related Support
How To Clean Up Ram On Windows Xp
Source: https://support.hp.com/us-en/document/bph07122
Posted by: petersonafess1946.blogspot.com
0 Response to "How To Clean Up Ram On Windows Xp"
Post a Comment